
Complete guide for institutes and training organizations

How to use Certificate Maker

Convert student or participant data from Excel into professional PDF, image and QR-verifiable certificates. Follow this guide from initial organization setup to certificate delivery.
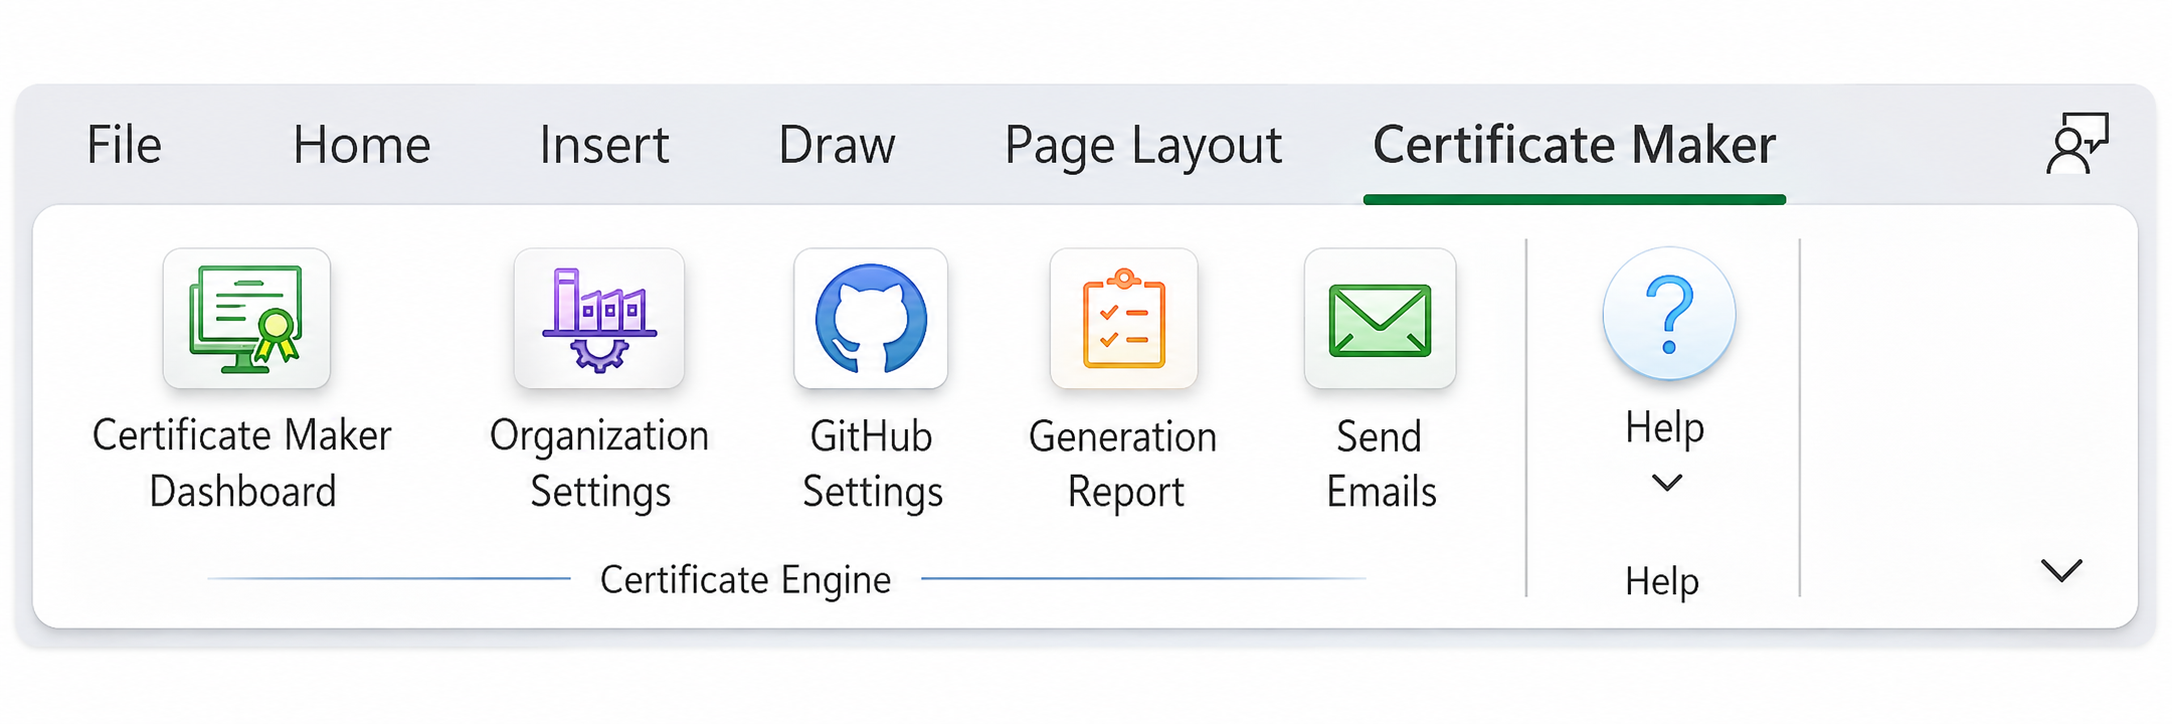
Certificate Maker ribbon in Microsoft Excel
Complete process

From an Excel sheet to verified certificates

Certificate Maker follows a structured workflow. Complete the setup once, then reuse it whenever your institute needs a new certificate batch.

1

Prepare Excel data

Create one column for every dynamic value required on the certificate.

2

Prepare PPT templates

Add the supported dynamic tags and branding positions to PowerPoint.

3

Configure organization

Save your institute name, logos, signatory and optional contact details.

4

Configure GitHub

Enable online HTML verification and QR codes when required.

5

Select range and template

Choose the Excel records, template folder, design and output location.

6

Generate outputs

Select image/PDF or image/PDF with HTML preview and generate the batch.

7

Review and upload

Preview results, view the report and upload any pending certificates.

8

Send certificates

Deliver each personalized certificate through Outlook or Gmail.

Step 1

Prepare the certificate data in Excel

Keep headings in the first row and one recipient per row. Your columns can match the exact needs of your institute or training organization.
  1. Add a clear heading for every value, such as Certificate ID, Candidate Name, Course Name, Issue Date, Grade and Email ID.
  2. Add any additional dynamic fields required by your design, such as Batch, Duration, Score, Training Program or Location.
  3. Ensure each candidate has one complete row and avoid merged cells inside the selected data range.
  4. Keep certificate IDs unique when you plan to use online verification.
  5. Include a valid email column if you want Certificate Maker to send individual certificates.
Important: Keep column headings consistent. The dynamic fields used in the PowerPoint template must correspond to the supported tags supplied with Certificate Maker.
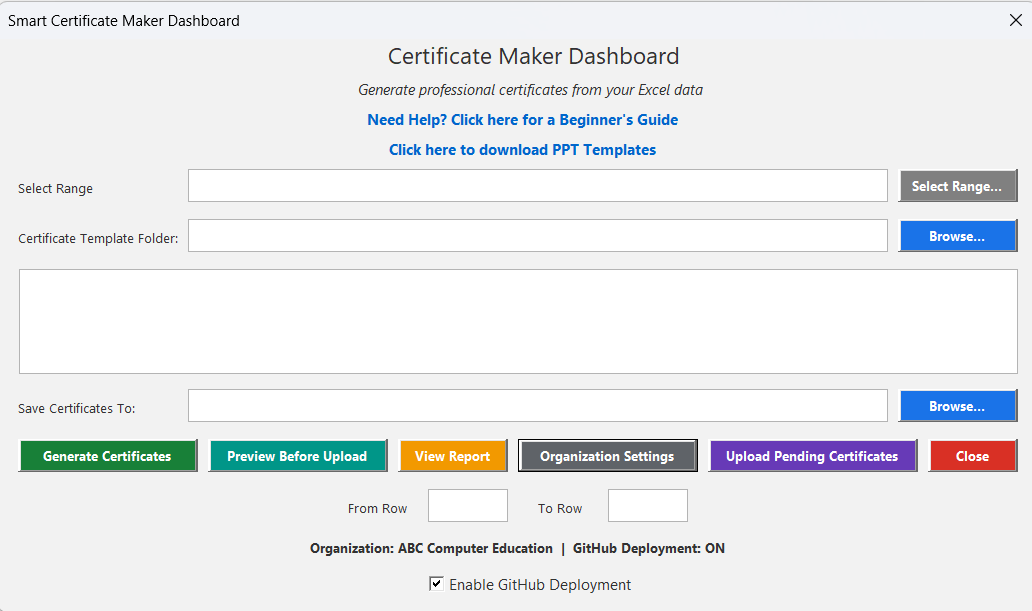
Smart Certificate Maker Dashboard
Smart Certificate Maker Dashboard used to select data, templates and output folders.
Certificate Maker ribbon showing the dashboard and settings tools
Open the Certificate Maker tab in the Excel ribbon to access every tool.
Step 2

Prepare your PowerPoint certificate template

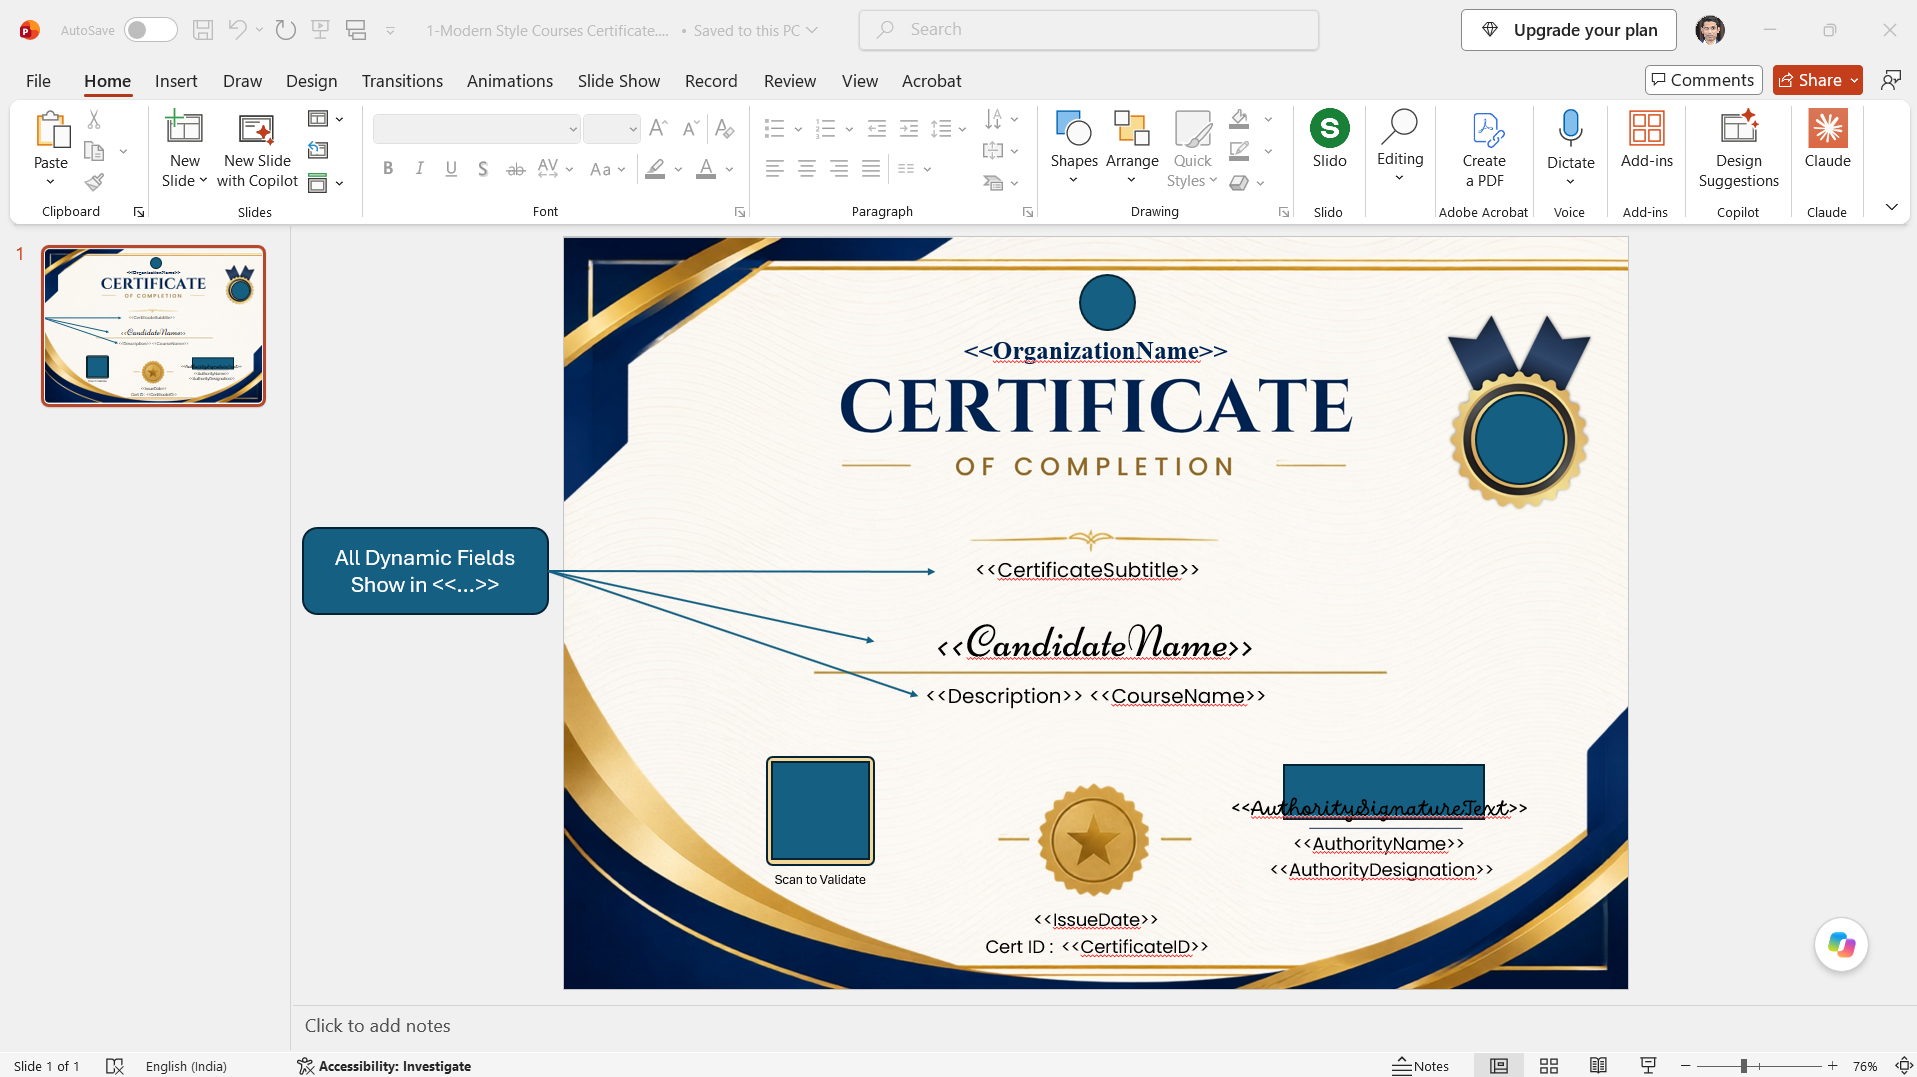
Use the templates provided with Certificate Maker or customize your own PowerPoint design. PowerPoint controls the visual layout while Excel supplies the recipient data.

  1. From Certificate Maker Dashboard, click Click here to download PPT Templates.
  2. Open a supplied PowerPoint template and customize its colors, fonts, borders and layout.
  3. Place the required supported dynamic tags where values such as candidate name, course, grade, issue date and certificate ID should appear.
  4. Keep every tag exactly as supplied. Do not change its brackets, spelling or spacing.
  5. Use the supplied organization placeholders for the institute logo, ISO logo, signature and other configured branding.
  6. Save each design as a PowerPoint file inside your certificate template folder.
A single template folder can contain multiple PowerPoint designs. Certificate Maker displays the available templates so you can select the correct design for each batch.
Step 3

Complete Organization Settings

Organization Settings stores the common information and branding that can be reused across your certificate templates.
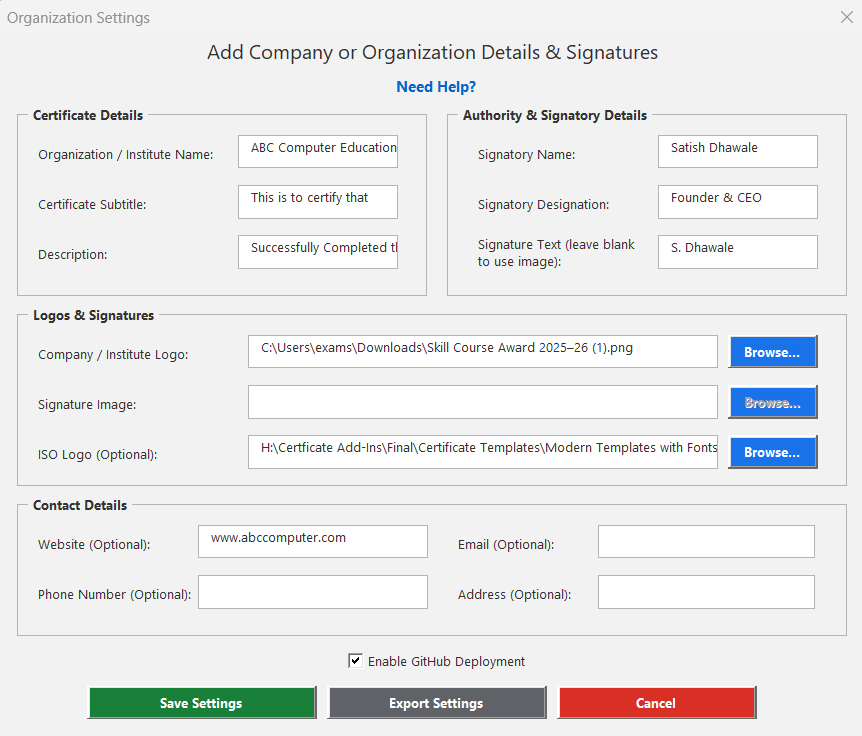
Add organization, signatory and contact details

Certificate details Organization or institute name, certificate subtitle and description.
Authority details Signatory name, designation and signature text.
Logos and signatures Company or institute logo, optional ISO logo and signature image.
Optional contact details Website, email, phone number and address when used in your template.
Signature rule: Use either Signature Text or a Signature Image. When Signature Text is entered, Signature Image is disabled. When a Signature Image is selected, Signature Text is disabled. Both cannot be used at the same time.
  1. Open Organization Settings from the Certificate Maker ribbon or dashboard.
  2. Enter the organization and authority information required by your template.
  3. Browse and select PNG or supported image files for the logo, ISO logo and signature image.
  4. Enable GitHub Deployment here if online verification will be used.
  5. Click Save Settings to store the configuration.
  6. Use Export Settings to keep a reusable backup of your organization configuration.
Certificate Maker Organization Settings form
Organization Settings for branding, signatory information, logos and contact details.
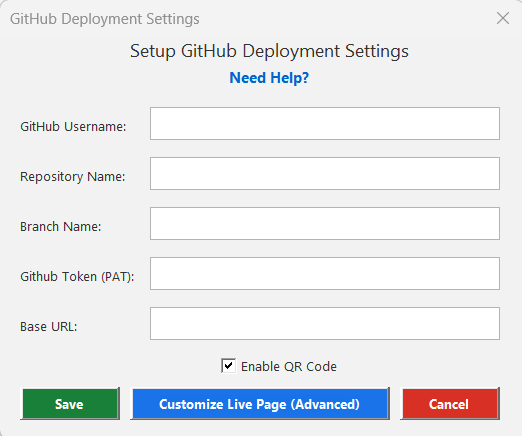
GitHub Deployment Settings in Certificate Maker
GitHub settings required for HTML certificate pages and QR verification.
Step 4 - Optional

Configure GitHub deployment and QR verification

GitHub deployment is required when you want each certificate to have an online HTML verification page and a QR code that opens that page.

  1. Open GitHub Settings from the Certificate Maker ribbon.
  2. Enter the GitHub username, repository name and branch name.
  3. Enter the GitHub Personal Access Token used for deployment.
  4. Enter the correct Base URL where the generated HTML certificate pages will be available.
  5. Select Enable QR Code so the verification URL is printed as a QR code on each certificate.
  6. Click Save. Use Customize Live Page (Advanced) only when you need to change the public HTML presentation.
Treat your GitHub Personal Access Token like a password. Do not share it, add it to a certificate, or publish it in a public file.
After deployment, scanning the QR code opens the certificate's HTML verification page. The recipient can view the certificate, download its PDF or image, and use the available Add to LinkedIn option.
Steps 5 and 6

Select your batch and generate certificates

Return to Certificate Maker Dashboard after completing the template and organization configuration.

Use the Smart Certificate Maker Dashboard

  1. Click Select Range and select the Excel table, including its header row and required candidate records.
  2. Click Browse beside Certificate Template Folder and select the folder containing your PowerPoint templates.
  3. Select one template from the designs displayed in the template area.
  4. Click Browse beside Save Certificates To and choose the output folder on your computer.
  5. Optionally enter From Row and To Row to generate only part of a large selected batch.
  6. Keep Enable GitHub Deployment selected only when HTML publishing and QR verification are required.
  7. Click Preview Before Upload to check the certificate layout before publishing.
  8. Click Generate Certificates when all selections are correct.
After clicking Generate Certificates, choose the required output mode: generate image and PDF only, or generate image, PDF and the HTML preview used for online verification.
Certificate Maker Dashboard showing range and folder selection
Select the Excel range, template, output folder and optional row limits before generation.
Generated results

Choose the output that matches your workflow

📄

PDF certificate

Suitable for printing, official records, email attachments and high-quality digital delivery.

🖼️

Certificate image

Useful for WhatsApp, social sharing, quick previews and convenient digital access.

🌐

HTML verification page

Published through GitHub and opened by the certificate QR code for online verification and downloads.

Steps 7 and 8

Review, upload and deliver the certificates

A

Preview Before Upload

Review certificate layout and dynamic data before publishing online.

B

Generation Report

Review generated records, output locations, links and certificate-generation status.

C

Upload Pending Certificates

Retry certificates whose HTML pages could not be uploaded during the original batch.

D

Send Emails

Choose Outlook or Gmail and send each certificate to the corresponding email address in Excel.

Before using Send Emails, verify recipient names, email addresses and certificate files. Test with one or two recipients before sending a large batch.
Sample QR-verifiable certificate generated by Certificate Maker
Expected result

A professional and verifiable certificate

The completed certificate can combine PowerPoint design, Excel data and saved organization settings into one consistent output.

  • Organization or institute name and logo
  • Recipient name and course information
  • Certificate subtitle and description
  • Issue date, grade and unique certificate ID
  • ISO or accreditation logo when required
  • Signatory name, designation and signature
  • QR code linked to the online verification page
  • PDF, image and HTML output options
View Sample Certificate PDF
Ribbon tools

Help, updates and licence management

Open Help from the Certificate Maker ribbon whenever you need assistance or product maintenance.

How-to guide and support

Open the Certificate Maker usage guide or submit a help and support request.

⬆️

Update Certificate Maker

Install an available update when a newer Certificate Maker version is released.

🔐

Licence status and uninstall

Review the current licence status or use the available uninstall option when required.

Before generating

Final checklist

Is the Excel data ready?

Confirm that headings are present, records are complete, certificate IDs are unique and email addresses are valid when email delivery is required.

Does the PowerPoint template use the correct tags?

Use the exact supported tags from the downloaded Certificate Maker templates. Do not change their spelling, brackets or spacing.

Are organization settings complete?

Verify the institute name, subtitle, description, signatory information, logos and optional contact details.

Did you choose signature text or a signature image?

Only one can be used. Remove signature text before selecting a signature image, or remove the image before entering signature text.

Is GitHub configured when QR verification is required?

Confirm the username, repository, branch, token and Base URL before enabling GitHub Deployment and QR Code.

Did you preview before generating the full batch?

Generate or preview a small test first. Check long names, course titles, logos, signatures, dates and QR placement before processing every row.

Ready to generate your certificate batch?

Complete the setup, preview one certificate and then generate the final batch.

Review the Steps Again